Integrating our APIs is a breeze, and if you are a developer, you will soon realize how quickly you can leverage our APIs to add SMS capabilities to your applications.
In this first part, we provide an overview of our SMS offerings, followed by a detailed developer tutorial to build a sample application that showcases an SMS use case on the Node.js platform.
Octopush SMS API Offering
At Octopush, we offer a robust CPaaS platform for SMS messaging. You can send SMS and voice SMS, with options for scheduling and two-way messaging. Additionally, we also offer an SMS 2.0 service for redirecting SMS receivers to landing pages.
Our suite of SMS APIs addresses many use cases related to marketing campaigns and customer interaction, such as:
- Online transaction verification: SMS is already a widely adopted medium for online transaction verification using OTPs (One Time Password). It is a lightweight form of communication and is generally considered more secure than Internet-based messaging solutions.
- Marketing campaigns: If you want to send bulk marketing campaign messages to all your customers, then SMS is a great option. As a legacy protocol supported by all mobile phones, it is a non-intrusive way of communication.
- Personalized messages: You can also send personalized SMS messages to customers on special occasions or embed links to direct them to landing pages with custom CTAs.
- Reminder service: SMS also comes in handy for sending notifications. If you are in the healthcare business serving homebound patients with critical healthcare needs, SMS becomes their messenger to alert doctors and nurses.
Sample Application: SMS OTP Gateway using Node.js
For building the sample application, let’s consider the ubiquitous OTP. If your business relies on sending OTP to customers, you can wrap our APIs to make an OTP gateway.
System Architecture
Essentially, an OTP gateway offers a bunch of APIs to send and track OTPs sent to specific phone numbers.
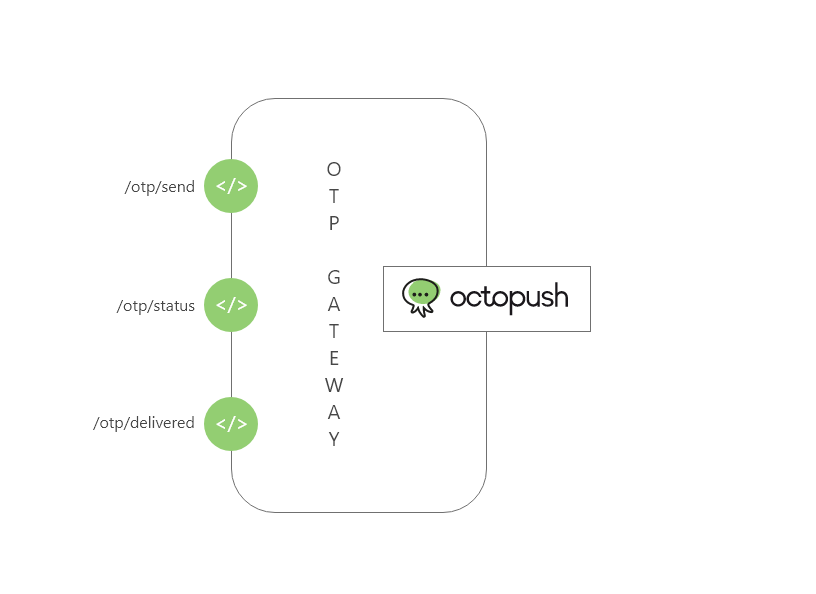
This OTP gateway has three API endpoints.
- /otp/send: For sending an OTP message to a specific phone number
- /otp/status : For checking the status of the last sent OTP for a phone number
- /otp/delivered: For updating the sending status of OTP to a phone number
We will show you how to build the OTP gateway as a Node.js application using the express.js framework.
The rest of this article covers the developer focussed tutorial steps for building this OTP gateway. It would be best if you have an intermediate level of proficiency in Node.js to follow the steps.
Prerequisites
You can test and run the OTP gateway from your local computer, as long as it is set up as per the requirements for the developer environment.
Here are the tools you need to set up to test the OTP gateway:
- Node.js: Setup a Node.js developer environment on your computer by downloading and installing the latest Node.js package from the official website.
- Ngrok: This is a tool to expose localhost APIs on the Internet. Sign up for using Ngrok from their official website, and install it on your computer.
Additionally, you also need an Octopush account to use our SMS APIs. Sign up for the free Octopush account and follow the on-screen instructions for verifying your account details.
You will have to perform a few follow-on steps to set up the account, which are provided later in this tutorial. Also, make sure to keep your credit card handy to purchase an SMS pack.
Source Code Structure
The complete source code for the OTP gateway sample application is available under our repository. Make sure to clone it within your development environment.
The primary code for the OTP gateway is index.js, a JavaScript file containing the business logic for all the three API endpoints supported by it. Let’s do a quick walkthrough of this code.
At a global level, it imports the express and the axios module. It also declares a variable deliveryStatusAndNumbers to store the OTP sending status for phone numbers. Finally, the express.js module opens up the port 3000 for listening to API requests.
const express = require('express')
const app = express()
const axios = require('axios')

const deliveryStatusAndNumbers = {}
app.use(express.json())
app.listen(3000)
The API endpoint for sending the OTP, /otp/send, wraps the Octopush SMS API as an axios post( ) call to send the SMS. The API request body is the same as defined by the Octopush Send SMS API.
app.post('/otp/send', function (req, res) {
  const config = {
    headers: {
      'Content-Type': 'application/json',
      'api-key': '<YOUR_OCTOPUSH_API_KEY>',
      'api-login': '<YOUR_OCTOPUSH_API_LOGIN>',
      'cache-control': 'cache-control'
    }
  }
  axios.post('https://api.octopush.com/v1/public/sms-campaign/send',
    req.body,
    config)
    .then(function () {
      for (const n of req.body.recipients) {
        deliveryStatusAndNumbers[n.phone_number] = 'SENT'
      }
      res.setHeader('content-type', 'Application/json')
      res.statusCode = 200
      res.json({ response_desc: 'Success' })
    })
    .catch(function (error) {
      console.log(error)
    })
})
After invoking the Send SMS API, the phone number is stored in the deliveryStatusAndNumbers with the status “SENT”.
The API endpoint for checking status, /otp/status, accepts the phone number and returns the delivery status of the last OTP sent. This is fetched from deliveryStatusAndNumbers.
app.post('/otp/status', function (req, res) {
  res.setHeader('content-type', 'Application/json')
  res.statusCode = 200
  res.json({ delivery_status: deliveryStatusAndNumbers[req.body.number] })
})
The third API, /otp/delivered, is a webhook that is invoked by the Octopush platform after the SMS is delivered. Triggering this API on the OTP gateway updates the OTP delivery status of a phone number.
app.post('/otp/delivered', function (req, res) {
  console.log(req.body)
  deliveryStatusAndNumbers[req.body.number] = req.body.status
  res.status(200).end()
})
OTP Gateway: Steps to Deploy and Test
Assuming that you have taken care of prerequisites and cloned the source code, it’s time you jump in to deploy and test the OTP gateway.
Step 1 – Configure your Octopush account
First, you must purchase an SMS pack from our website. You can do so by accessing the order menu.
After this, you have to enable the service and generate the API credentials for invoking the Octopush SMS API.
Make sure to save the API key generated at the end of this process in a secured vault. This key is your unique credential to invoke the Octopush APIs and should not be shared with anyone else.
Step 2 – Send a test SMS using API
Before integrating the Octopush SMS API within the OTP gateway, it is a good idea to test it directly to ensure that your account and API key are working correctly.
You can use an online API testing tool such as https://reqbin.com to fire up the API.
Open the https://reqbin.com page on a browser and enter the API endpoint as https://api.octopush.com/v1/public/sms-campaign/send, and the API headers as follows
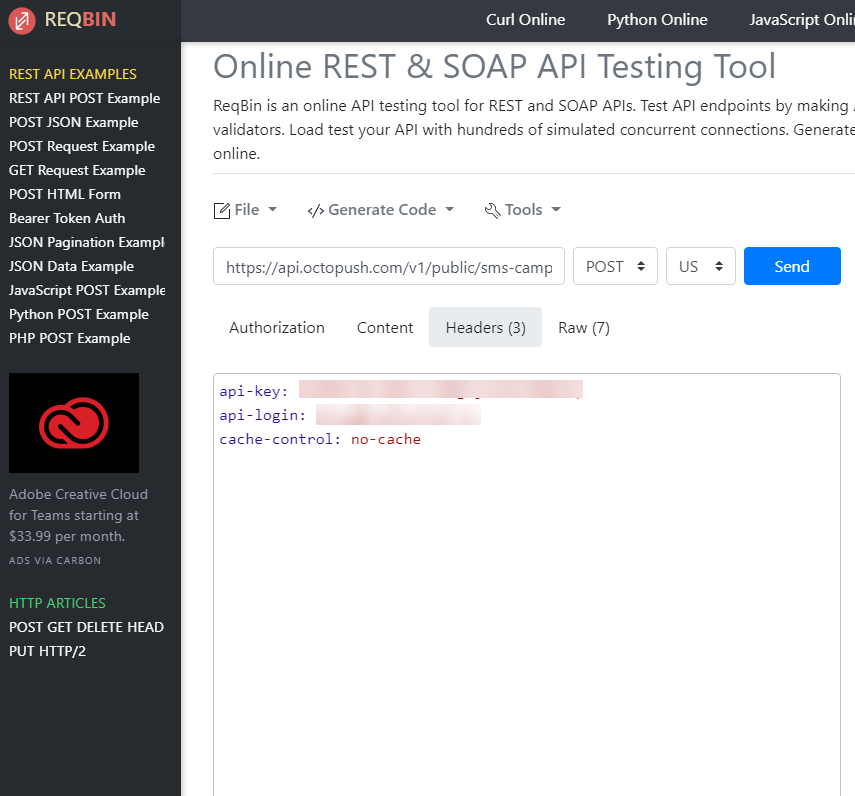
Make sure to use your API key and login email id for the api-key and api-login header fields, respectively.
Next, click on the Content tab and enter the API request body as shown below.

For quick testing, use your mobile number for the phone_number field ( prefixed with the ‘+’ symbol followed by the country code) and provide a value for the first_name and last_name fields.
Hit the blue “Send” button. You should see an SMS on your phone in a few seconds.
a
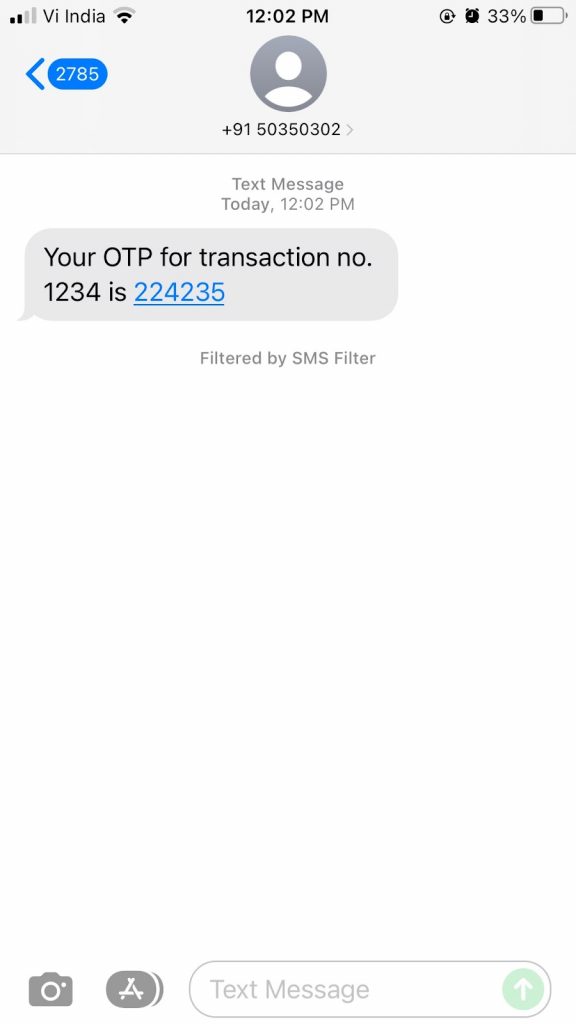
hurrah! You have sent the first SMS using Octopush SMS API.
Now you are all set to implement the OTP gateway.
Step 3 – Integrate your Octopush API key in OTP Gateway code
Open the index.js file from the cloned repository and replace the placeholder <YOUR_OCTOPUSH_API_KEY> and <YOUR_OCTOPUSH_API_LOGIN> with your API Key and login email id in the API header.
Save the file, and you are good to go.
Step 4 – Deploy OTP Gateway
Deploying this OTP gateway involves three activities.
- Install and deploy the Node.js application.
- Deploy the ngrok tool for exposing the localhost APIs of the OTP gateway on the Internet.
- Setup the webhook for sending SMS delivery status to the OTP gateway.
Install and deploy the Node.js application
Open a command line terminal and change the directory to the root of the cloned repository.
1. Install the Node.js dependencies for OTP gateway
npm install
This will install the express and other dependencies needed to run the application.
2. Run the OTP gateway
node index.js
With this command, the OTP gateway is now deployed on localhost and is listening on port 3000.
Deploy the Ngrok tool for exposing the localhost APIs of OTP gateway on the Internet.
To deploy Ngrok, open a second command line terminal window and run the command:
ngrok http 3000
This will open up a channel from a public URL to the localhost port 3000, where the OTP gateway is running.
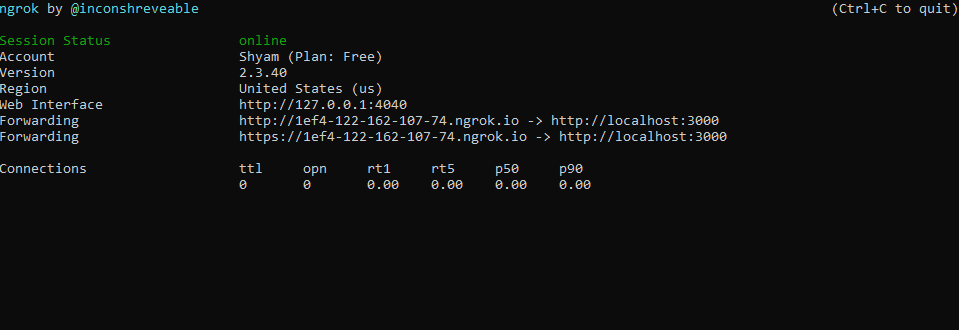
The public URL will be unique for your ngrok account and will change every time you run ngrok. So make sure to keep a note of it.
Based on the URL shown above, you can trigger the OTP gateway APIs from the Internet by prefixing the API endpoints with the ngrok generated public URL as follows:
| http://1ef4-122-162-107-74.ngrok.io/otp/send | For sending OTP |
| http://1ef4-122-162-107-74.ngrok.io/otp/status | For checking the status of last OTP |
| http://1ef4-122-162-107-74.ngrok.io/otp/delivered | Webhook for setting the OTP delivery status |
Setup the webhook for sending SMS delivery status to OTP gateway
At this point, your OTP APIs are hosted and accessible over the Internet. As the last activity, you have to set up the webhook on the Octopush dashboard to update the SMS delivery status. Follow the screencast below to locate the callback settings page on the Octopush dashboard.
Update the “HTTP SMS deliveries callback URL” text box with public ngrok URL for the /otp/delivered API endpoint. Save the settings.
Now, whenever an SMS is sent from your Octopush account, this API will be triggered to update the delivery status. Subsequently, the OTP gateway will update the status, as you saw in the code earlier.
Step 5 – Test the OTP Gateway
Let’s put the OTP gateway on a test drive.
You can launch https://reqbin.com on your browser and trigger a new OTP via the public URL for /otp/send endpoint.

Upon triggering the API, you get a 200 OK response with the response message as “Success”.
Similarly, you can trigger the public URL for /otp/status endpoint to check the delivery status of the last OTP.
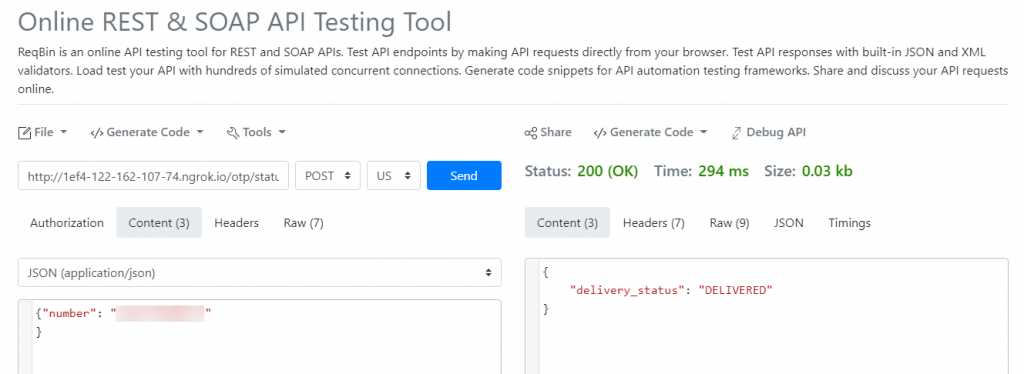
You can see that the API response contains the status “DELIVERED”. This status is updated from the callback that you configured in the previous step.
Go ahead and experiment with the OTP gateway by sending OTP to different numbers and checking their statuses. Also, you can try some failure scenarios, such as sending OTP to an invalid number or a switched-off number, to check the status. In such cases, you will get the status as “SENT” or “ACK“.
Now you have a basic and functional OTP gateway for all your OTP messaging needs.
The Octopush Advantage
You just witnessed a simple way of integrating OTP features in a Node.js program powered by Octopush SMS API. And as you probably realized, it is quick and easy to integrate with real-world applications to take care of your OTP communication requirements.
With Octopush, you get a reliable SMS API that:
- meets the best security and compliance standards, such as GDPR and ISO 27001.
- serves diverse industries from healthcare, fintech, legal, e-commerce and more.
- is highly available and accessible from around the world.
Stay tuned for more demonstrations coming soon using the Octopush SMS APIs, and let us know how you would like to leverage this sample application for your business needs.